

Ask respondents for their email and mobile number in a separate registration survey, so their contact details can never be connected to their answers in your main survey.
When to use it
Use this when your survey has sensitive questions and you still want to collect contact details, for example for a prize draw or invitations to future surveys.
Example: a survey asks which party the respondent voted for and about their religion. At the end, it asks “Would you like to take part in the prize draw?” Respondents who answer yes get a link to a separate registration survey, where they enter their contact details. The two sets of answers are stored in different projects, with nothing that links them.
How it works
- The main survey shows a link button to respondents who want to share their contact details. The link is the same for everyone and carries no respondent ID, so the registration can’t be traced back to an answer.
- We recommend a link button rather than a redirect. A redirect sends the respondent straight on when they finish, which makes it easier to match the two responses by timing.
- The registration survey is a secure survey. Respondents register with their name, email and mobile number and confirm with SMS or BankID. Each person gets their own login, which stops the same person from registering several times through the same link.
How to set it up
Step 1: Create the registration survey
- Create a new project for the registration survey.
- Click the settings icon (⚙️) → Advanced → Secure survey → Enable.
- Add your questions, for example consent, background questions and an attention check.
- Add a final question with a checkbox, for example
I'm done and ready to finish. - Go to Responses → the nine-dot menu → Auto complete, and select the final question. Respondents who tick the checkbox now get the status Completed.
Step 2: Let respondents register themselves
- Go to the Clients tab.
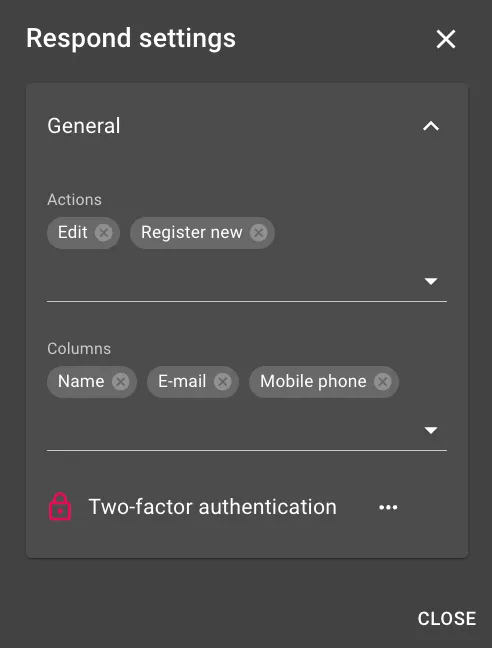
- Click the settings icon (⚙️) → Respond settings.
- Under Actions, add Register new and Edit. Edit lets respondents change their contact details later.
- Under Columns, add Name, E-mail and Mobile phone.
- Click the three-dot menu (⋯) next to Two-factor authentication, and select SMS or BankID.
- Click Close.
Step 3: Create the registration link
- On the Clients tab, click Add clients and create an empty client. You don’t need to fill in or change anything.
- Copy the client’s URL.
- Remove the password part at the end of the URL (
&p=...). - To show the login page in Swedish, add
&lang=svto the end.
The link changes from:
https://insight.researchautomators.se/DialogTuner/Logon.aspx?Ref=<id>&p=<password>
to:
https://insight.researchautomators.se/DialogTuner/Logon.aspx?Ref=<id>&lang=sv
Step 4: Add the link to your main survey
- Open your main survey and add a yes/no question, for example
Would you like to share your contact details? - Add a page break, then a text item that is only shown to respondents who answered yes.
- In the text item, click the bookmark button ({}) and add a link.
- Paste the registration link in To which URL should this link refer?, and enter a button text in Text, for example
Click here. The link opens in a new tab, so the main survey stays open.
What the respondent sees
- The respondent clicks the link and lands on the login page.
- They click Register new.
- They enter their first name, last name, email and mobile number, and click Register new.
- They receive a code by SMS and enter it to confirm.
- They answer the registration survey.
[Screenshot: Login page and the Register new form]
Good to know
- Respondents who answer no in the main survey can be sent to a screenout. Change the screenout text, since the default message says the respondent wasn’t in the target group.
- The respondent still needs to finish the main survey for those answers to count. Tell them in the text item, for example
Save the link and finish this survey first. - On the thank-you page of the registration survey, you can add buttons that let respondents save their survey link or change their contact details.